Friday, October 14, 2016
Rolling Ball Maze on Carvey
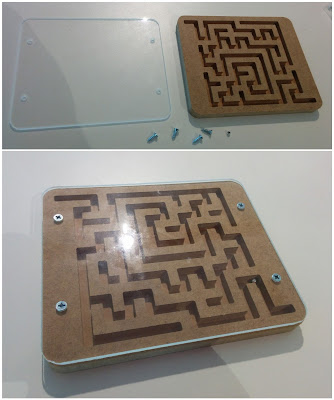
My local maker space, Thinkspace, has had a Carvey for a couple of months, and I've finally gotten around to giving it a try. I decided to make a little rolling ball maze by using Carvey to carve a 3D maze path into a piece of wood and cover it from the top using some clear acrylic.
I found some python code here for randomly generating orthogonal mazes using a simple random depth first search algorithm. I modified to code to take the resulting maze and calculate the set of 2D line segments corresponding to the inner space of the maze (what I would be carving). I then added code in the python script to output the set of lines at an SVG vector graphics file that could be read into the Carvey software Easel. SVG line segments in Easel/Carvey get treated as a single pass by the carving bit, and hence the line thickness is dictated by the thickness of the drill bit used. The largest milling bit available was 1/8 inch, and so the path of the maze was pretty narrow. I went ahead and tried it out anyway, just to see that it worked.
In order to provide mazes with a larger channel width, I tweaked my python script to also output SVG files in which each line segment was represented by a rectangle object. I tried carving a maze with a 1/4 inch channel thickness using a 1/8 inch milling bit, and results still looked good. I found some information here that explained that Easel assumes the coordinates in the SVG file during import correspond to 96 pixels per inch, and hence I scaled my maze coordinates accordingly to make the distance between channels twice the milling bit diameter, such that the maze channels and walls were equally thick.
For the finished product I added a cut out around the maze with rounded edges. I also created a second piece carved out of clear acrylic to cover the maze so that the ball doesn't fall out. For the acrylic cover, I also added four holes so that I could screw on the cover to the wood. I wanted the screws to sit flush with the acrylic surface, so each hole has one diameter that goes straight through the material and a second larger diameter hole that just goes 2 mm in, and acts as a countersunk hole. Once Carvey had finished milling out the two pieces, I placed a little silver bead inside the maze and screwed the cover on top with four screws. I also used a hand drill to put in some pilot holes for the screws: I was going to do this with Carvey, but I was using a 1/8 inch milling bit and my screw threads were smaller than this.
You can get the python script to generate your own maze including acrylic cover here: generate_carvey_ballmaze.py. Import the generated SVG files one at a time into Easel. These files assume a 1/2 inch thick piece of material for the maze and a 3 mm thick acrylic with 1/4 inch diameter screws.
Subscribe to:
Post Comments (Atom)


No comments:
Post a Comment